IT STARTED ON SAWYER

Adventures in Sustainable Renovations


1 Comment

Wk 50 – Another Week Closer

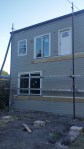
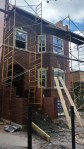
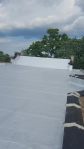
Another week and another host of new updates to post! Starting with the exterior, our metal contractors continued their work on the deck and exterior stairs. They ended last week by spray-painting the erected metal with a protective layer of primer and another coat of black paint. This week, they are back to finish the job, and they have installed the railing on both decks and stairs.

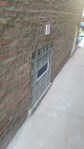
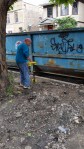
In the front, we scoped the drain piping from the front bay window wells and unfortunately found out that the piping had completely eroded and had collapsed. Therefore, we had to dig out the drain pipes (they were 6 feet below the dirt), including the 4-way junction pipe and install brand new ones. This work was unexpected, but since we were doing it, we decided to add in a clean-out access point on the exterior of the building. This way if there are ever any issues, we have a simpler access point, and won’t have to go through the interior of the house.

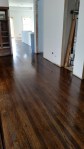
On the interior, millwork on the 2nd floor apartment is about 95% complete, so we have started some painting of the ceiling and walls and staining of the woodwork. Since this will be a rental apartment, we chose a warm neutral gray to give the apartment some character (as opposed to apartment white) while keeping it neutral enough that tenants would like it. For the woodwork, we are going with the same dark walnut color as we used on the floor. This will help bring back some of the home’s original character that we fell in love with when we first bought the building.

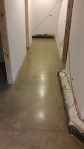
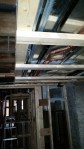
In the basement, the millwork has continued, this week focusing on building up the basement footings. As you may recall, we had to install the footings to reinforce the basement foundation, but now we have to find a nice way of incorporating them into the living space. In the master bedroom and public areas, we’re going with the stain-able hardwood over the top, while the remaining areas we’re going with the white MDF board (a little cheaper + we would be painting it white in those spaces anyway).

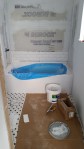
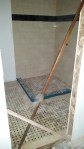
Our tile contractor was back on site working on the basement bathrooms. Each bathroom will have a different look to it, but hopefully enough similarities that the overall feel of the space will work well together. In the guest bathroom we are going with a modern, elongated, subway tile with a splash of blue / green decorative tile mixed into it. The shower floor will have a hexagon patterned marble tile. In the masterbath, we went with a volcanic basalt tile on the walls, but a marble tile on the floor and ceiling, as to make sure that bathroom doesn’t look too dark and heavy. Andrea and I were nervous with this pick, but I think its turning out rather nicely.

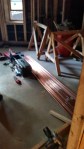
Finally, mid-week we took some time to stop by our neighbor’s workshop. Our neighbor, Fred, is a detail carpenter / wood specialist and several weeks back we gave him the original front door to the house in the hopes that we can get the door restored to its original character. Some of the detail wood was in very poor condition, so he is will replicate the original detail with new wood pieces. To strip some of the old paint and stain off of the wood, he bought a volcanic pompous stone to use over sandpaper as he can better get the stain out without damaging the wood grain itself. He’s got a lot of work left on that door, but its great to see progress!


Leave a comment

Wk 49 – Doors, Trim, and Metal

As another week passes, our project starts looking more and more like a house again. This week, we’ve made more substantial progress on finish millwork, HVAC, tile work, and structural work.

At the beginning of the week, our carpenters delivered our interior doors to the building. There are a number of original doors that we have attempted to save, but many required too much restoration for the benefits to be worthwhile. The doors we did save, included beautiful pocket doors (which suffered some damage during the demo process) and three original doors with stained glass inserts. I’ll share some photos of those doors once we get them out of storage and start getting them restored. The doors we did order for our project are solid core unfinished doors. Over the course of the week, our carpenter installed interior doors in both apartments, and continued to work on the finish millwork.

Midweek, we also had our carpenter rip up the old carpet from the main stairwell, so that we could gauge the condition of the woodwork underneath. Luckily, the carpet has seemed to protect the stairs from decades of wear. The carpet itself left many tiny nails / staples that have to be pulled one by one, but once those are removed, our floor guy will sand, stain and poly the stairs back to their formal glory.

Also this week, our tile guy came back through to start water proof lining the basement showers to prep for the upcoming tile work. While on site, he also went back to the 2nd floor bathrooms to install the final finish grout and apply a sealer which should protect the grout and tiles from soap scum and other oily substances from the typical shower products.

Over the weekend, Andrea and I purchased most of the light fixtures for the 2nd floor unit and for one day during this week, our electrician sent out one technician to install them. We went with some basic fixtures in the bedrooms, office and living room. We picked out a ceiling fan for the sun-room, some pendant lights over the future island, and a flashier fixture in the entryway.

Finally, our metal contractor has arrived to start building out the exterior back stairwell and balconies. Our contractor pre-fabricated many of the pieces used for the structure back in his shop. He then delivered the material to our project site and welded them together to create the structure. By the end of the week, the main structural members were installed and at least one protective coat of paint has been applied.


Leave a comment

Wk 48 – Bathrooms and Floor Progress

This week has seen nice progress on the second floor bathrooms, the flooring on the second floor, and the basement concrete floor. We also had our HVAC contractor deliver the 2nd floor furnace and water heater for full installation over the next week or two.

During this week, our tile contractor has completed laying tile in both the second floor master bathroom and hall bathroom. In the hall bath, you can see in the photo below that the shower lip has not been tiled. This is because of the weight of the glass panels, as well as occupants stepping on it, will eventually cause tile to crack in these locations. Instead, we will have our countertop contractor provide a thicker slab that will better support the weight placed on the shower lip.

Next, our hardwood flooring contractor had a busy week sanding, patching and staining the floor boards on the second floor. Sanding is done to smooth out any imperfections, but it also helps even out the new floor boards with the existing flooring. Next, our contractor applied a wood putty anywhere he felt there were wood imperfections, nail holes, nicks, etc. He then came through with the sander again to give the floor a smoother finish. Once this process was complete, he came through and applied a thick coat of stain. The floor takes several days to cure, after which we’ll continue with milwork, doors, and hopefully on to paint!

Finally, in the basement, over the course of the week, the concrete has been ground and polished to its final smoothness. After the final polish, the contractor applied a liquid densifier / hardener to the concrete. This product helps protect the concrete from stains, scratches and moisture and it gives the floor a nicer shine to it.


Leave a comment

Wk 47 – The Interior takes shape

I have a big photo update to share with everyone. To start the week, our drywall contractors finished mudding the walls and they came through with a white primer and primed all of the walls and ceilings. This has allowed us to start working on the interior finishes!

Our flooring guy has evaluated the condition of the existing (what remains) floor and removed the floor boards that can’t be saved. Starting with the 2nd floor, he laid out and installed the floor boards on top of a water proof membrane. He then matched up the new floor boards with the old, integrating and staggering the boards, so that there won’t be an obvious transition between the new and the old. Any height difference in the floor boards (and there is one) will be sanded down at a later stage.

Our tile guys finished sloping and waterproofing the showers and they have begun to lay tile in the second floor mater bath. This is a smaller bathroom, therefore we are trying to keep the style light while also bringing back some of the original building charm. So to start, we are laying down a white and black mosaic floor tile. Later, we will match that up with a white subway tile. Hopefully, the light colors will keep this bathroom feeling open and functional.

Our tile guys also laid a simple tile in the HVAC and laundry closets to add a water proof flooring for which to install the equipment / appliance on.

Once the flooring contractor finished installing the second floor apartment’s floor boards, we scheduled for Studio 41 to deliver the second floor kitchen cabinets. For both units, we decided to purchase cabinets that were certified through the KCMA Environmental Stewardship Program. This certification evaluates cabinet manufactures and their products based on five categories: indoor air quality, product resource management, process resource management, environmental stewardship, and community relations. To learn more about the certification, see the following link: http://www.greencabinetsource.org/Learn_about_ESP/Certification_Requirements

Along with installing the cabinets, our carpenter has begun to work on some of the second floor finish millwork. Our contractor started with installing the wood beams in the dining room and framing out the living room windows.

Meanwhile in the basement, our concrete contractor came back to level out the back stairwell landing. We also brought out our concrete finish contractor to start grinding down the basement concrete floor. This will be a multi-day process, starting with a small grit sander to remove and level the concrete floor, moving towards a larger grit to eventually finish and polish the concrete floor.


Leave a comment

Wk 46 – Drywall mudding and Copper Roof!

Happy New Years! As one can see from the photos and dates of our blog entries, we’re a little behind with our construction updates. We’ll try to catch up with more updates and pictures over the next few weeks!

Week 46 was another busy week at the house. The drywall contractors finished hanging all of the drywall and started mudding and sanding the walls. This is a multi-day process to get the walls nice and smooth. They apply the rough pass of joint compound, let it dry, sand it down, repeat. Joints and corners require multiple passes to have a final finished feel to them.

In the mean time, our tiling contractor has stopped by to create our pre-slopes for our future showers. The shower curbs were previously built by our carpenter, and the durock cement board was placed around the curbs by our drywall contractor. Our tile contractor uses a thinned out concrete mix to create a slope from all four corners towards the drain. Done correctly, this will ensure there won’t be any standing water and everything will drain properly.

Finally, as mentioned in the Wk 43 blog post, our front roof contractor built out the structure for the roof over hang. Early this week he came back to install the roof shingles. Andrea and I went with a reddish brown shingle to mute the contrast between the red-brick, shingle roof, and an eventual patinated copper roof. Over the past two months, our roofing contractor has replicated the details from the old roof and in the middle of the week he brought them on site to install! It took him two days to install and finish the front roof. Its great to see the front of the building really coming together!


Leave a comment

WK 45 – Time for Drywall

With the insulation installed on the walls, our drywall contractor has sent out a full crew to install the drywall. We asked them to start on the 2nd floor ceiling so that our insulation contractor can complete the last of the insulation, which is the blown in fiberglass roof insulation.

Other than the coordination with the insulation contractor, installing the drywall is pretty straight forward. The bathrooms, kitchen walls and the lower half of the basement walls get a moisture resistant drywall. Walls that will have tile installed get Durock, a cement board product that is strong enough to hold the weight of the tile. Everything else gets standard drywall. With the drywall crew working in every place in the building, we didn’t schedule anyone else to come work on site during the week. Nevertheless, for the first time in three quarters of a year, we finally start to get a sense of how the various rooms in the building will look and feel.


Leave a comment

Wk 44 – Insulation

With the front roof framed out, the initial water tight membrane laid, and the window flashing complete, the building is finally water tight. Our electrical conduit is complete and rough-in inspections for MEP have all been signed off on. Bring on the insulation!

In our on-going effort to use more environmentally safe materials, we decided to go with EcoBatt Knauf Insulation. Their ecobatt product uses a bio-based binder instead of a formaldehyde binder, thereby significantly reducing the number of chemicals leaching into the indoor environment. For our roof insulation, we are going with a fiberglass blown insulation to reach an insulation value of R-49. For our walls, we are aiming to achieve a R-21 value using Fiberglass batts.

Like everything we’ve touched so far in this project, there were a few spots in the house that made insulation a little more difficult. Since we were keeping the trim intact around the dinning room bay windows, we didn’t have the typical wall depth that you get with new framing. The old framing gave us about one inch to work with, so we had to use a rigid board insulation that can give us good protection but can fit the space. In the basement, we are taking a preventative measure by not extending the batt insulation all of the way to the basement floor. Instead, the bottom foot or so of the wall is a moisture resistant rigid foam that, in case moisture does ever collect right at the base of the wall, will resist any mold or rot.  Finally, between the 1st floor and the 2nd floor unit, we are installing a layer of sound proofing insulation, which should dampen any sounds between the two units.

It isn’t too difficult to find contractor’s willing to install insulation for a very minimal price. On certain tasks, we have certainly gone with the cheapest bid. For this bid however, we made sure that we are hiring a high quality contractor to do this job right. We went with Minnich Insulation as they had a number of good reviews and were Building Performance Institute, Building Analyst and Envelope certified. In addition to our insulation contractor installing all of the wall and ceiling insulation, he also went through the building sealing all crevasses, outlets, piping penetrations, and other little openings to create a tight air sealed enclosure for our building. As good as the insulation is for our building, without a proper air sealing of the building, the money spent on insulation would be practically wasted. Its the attention to detail, especially while air sealing, that I think makes the biggest difference in quality between insulation contractors. For more on air sealing, see http://www.greenbuildingadvisor.com/air-leaks-waste-energy-and-rot-houses

Finally, with Insulation in full swing, our drywall contractor is preparing to start his work as well. Mid-week, we got a large drywall delivery to the building! Once it gets started, drywall will be installed in a hurry, so we’re looking forward to some big changes in the next week or two!


Leave a comment

Wk 43 – The scaffolding is back

After the windows went in and the flashing brought the old character back to the front of the house, it seems like we have taken a step backward with the scaffolding having gone back up. However, it does actually mean the start of the difficult process of rebuilding the front roof. What makes this roof so much more complicated is that it was originally built with an interior gutter system that runs right above the front bay. (This was also where the gutter originally failed and lead to the massive water problems for the original owner. The water washed away the front facade from the inside causing significant structural damage). Our plan is to move this gutter as far forward as possible while maintaining the original character of the house. So this week, our roofing contractor began to frame out the structure of the roof. He also brought a mock-up of the final detail for the front face of the roof detail. From the time of demo, we kept a piece of the under side of the decorative roof which our contractor will try to emulate.

Other progress this week included installing the glass block windows in two basement closets and one in our master bathroom. The siding guys made great progress and have brought the siding all the way up to the roof line. Finally, we took down the silt fence in the front, so we installed the permanent side gate in the front of the house.


Leave a comment

Week 42 – Flurry of Construction!

This week has seen an exceptional amount of work done, mostly due to the number of various trades coming on site everyday. Our HVAC contractor was on site this week to drill through exterior wall to route the exhaust fan ducts from the basement bathrooms to the exterior. Our Electrical contractor kept plugging away at roughing in the electrical and he was able to install the recessed can lights in our first floor dinning room (we have kept the ceiling because we are afraid that demo would damage the original wood beams). Our plumbing contractor roughed-in the gas piping. Due to space restrictions, we will end of with a larger bulk head in the north side of the basement, but to minimize this bulk head, the ducts, conduit, gas and water piping are packed as close together as possible. Our plumber also installed the bathtub in the second floor master-bath and the bathtub in the basement hall bath (this one was a nice donation by our family general contractor from a project that decided not to use it). Finally, our plumber installed the thermo mixing-valve for our bathrooms.

in the front of the building, the basement front bay side windows have window wells originally required as emergency egress. These window wells have drains built into them, which we knew have been clogged and will at minimum need cleaned out. This week, we brought a specialized plumber to scope our main drainage and sewer lines. With a few unique tools and a camera, the contractor marked the depth of the sewer line as well as the location of the main connections between the window well drain lines to the house main sewer line. Through the camera, we can see that at minimum, we will need to replace the drain pipe elbows. The main sewer line runs directly underneath the 50 foot tree that grows in front of the building and it has roots that have penetrated the pipe. Once we replace the drain piping, we will have access to the sewer line from the front of the building and we will send a roto-rooter through to clean out the main line.

In addition to our MEP contractors, we had our concrete contractor dig foundation holes in the backyard for the future supports for the back stairwell and deck. He placed a central line to keep an equal distance from the building (9 feet) and he dug out the holes for the foundation supports keeping equal distance between the eventual columns.

On the back addition, we also had our siding contractor start work this week. We choose to go with HardiePlank, which is a high quality cement board siding that should give us minimal maintenance and a strong longevity. The product is a little more difficult to install then a vinyl siding, but we have been very pleased with the contractor we have found. We set up his work area in the backyard to measure out and cut the exact dimensions of the pieces he needs. Then he mounted each piece making sure its level and overlaps the piece beneath it.

Meanwhile, we are also gearing up to start insulation on the interior of the building. In order for us to start, we need to be sure that the building is completed sealed from the outside. Our biggest remaining air gaps have been the framing surrounding the windows. To complete the exterior, we found a contractor to installed the window flashing and caulk any remaining openings from the exterior of the building. The flashing covers up the visible plywood and adds a nice final look to the windows. Once the contractor began to complete a few windows, the flashing really helped make some of the original brick arches become more defined.

Finally, with our MEP contractors having finished all of their stub outs through the roof, we had our roofing contractor come back and finish our back-roof. This work included properly sealing all of the vent stub outs, adhering the roofing to the firewall, and painting the roof a reflective color to minimize heat gain and reduce the heat island effect. (For more information, please see http://www2.epa.gov/heat-islands/using-cool-roofs-reduce-heat-islands ). A green roof would have been the ideal, but we are quickly running out of funds for this project and a green roof would be too cost prohibitive.

All said, we had over 20 different people working on the building this week! Its great to see such progress and here’s to keeping up the momentum!


Leave a comment

Week 41 – MEP continued

With the building enclosed and the security system installed, our contractors begin installing the more vulnerable components of their system. Our plumber has delivered the copper piping and over the course of the last week piped the majority of the domestic water system.

Our electrical contractor has brought over the heavy duty main electrical wiring, the electrical meter housing, the main power disconnects, fuse boxes, and bathroom exhaust fans. Over the course of the week, the main conduit piping has been installed on the exterior of the building and has been connected to the meter housing and building disconnects. The bathroom exhaust fans have been installed on the second floor and the 1st and 2nd floor as well as the public area electrical fuse boxes have been installed. Unfortunately, due to a max distance requirement from the main power cut out to our fuse box, we have ended up with fuses in one of our basement bedrooms as well as one in a 2nd floor bedroom. This is not ideal and we’ll have to incorporate this into the final look as best as possible. With the fuse boxes in place, this allows our electrician to start running the conduit from around the apartment back to the main power source.

Finally, our HVAC contractor kept plugging away at installing duct work and PVC exhaust flues. The biggest accomplishment of the week was running the 3 exhaust flues (future furnace, and 2 water heaters) from the basement mechanical room up through the building and out through the roof. We have asked all of our contractors to complete their roof stub-outs as soon as possible so that we can finish our roof installation.