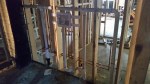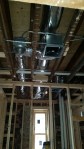
This week has seen an exceptional amount of work done, mostly due to the number of various trades coming on site everyday. Our HVAC contractor was on site this week to drill through exterior wall to route the exhaust fan ducts from the basement bathrooms to the exterior. Our Electrical contractor kept plugging away at roughing in the electrical and he was able to install the recessed can lights in our first floor dinning room (we have kept the ceiling because we are afraid that demo would damage the original wood beams). Our plumbing contractor roughed-in the gas piping. Due to space restrictions, we will end of with a larger bulk head in the north side of the basement, but to minimize this bulk head, the ducts, conduit, gas and water piping are packed as close together as possible. Our plumber also installed the bathtub in the second floor master-bath and the bathtub in the basement hall bath (this one was a nice donation by our family general contractor from a project that decided not to use it). Finally, our plumber installed the thermo mixing-valve for our bathrooms.
in the front of the building, the basement front bay side windows have window wells originally required as emergency egress. These window wells have drains built into them, which we knew have been clogged and will at minimum need cleaned out. This week, we brought a specialized plumber to scope our main drainage and sewer lines. With a few unique tools and a camera, the contractor marked the depth of the sewer line as well as the location of the main connections between the window well drain lines to the house main sewer line. Through the camera, we can see that at minimum, we will need to replace the drain pipe elbows. The main sewer line runs directly underneath the 50 foot tree that grows in front of the building and it has roots that have penetrated the pipe. Once we replace the drain piping, we will have access to the sewer line from the front of the building and we will send a roto-rooter through to clean out the main line.
In addition to our MEP contractors, we had our concrete contractor dig foundation holes in the backyard for the future supports for the back stairwell and deck. He placed a central line to keep an equal distance from the building (9 feet) and he dug out the holes for the foundation supports keeping equal distance between the eventual columns.
On the back addition, we also had our siding contractor start work this week. We choose to go with HardiePlank, which is a high quality cement board siding that should give us minimal maintenance and a strong longevity. The product is a little more difficult to install then a vinyl siding, but we have been very pleased with the contractor we have found. We set up his work area in the backyard to measure out and cut the exact dimensions of the pieces he needs. Then he mounted each piece making sure its level and overlaps the piece beneath it.
Meanwhile, we are also gearing up to start insulation on the interior of the building. In order for us to start, we need to be sure that the building is completed sealed from the outside. Our biggest remaining air gaps have been the framing surrounding the windows. To complete the exterior, we found a contractor to installed the window flashing and caulk any remaining openings from the exterior of the building. The flashing covers up the visible plywood and adds a nice final look to the windows. Once the contractor began to complete a few windows, the flashing really helped make some of the original brick arches become more defined.
Finally, with our MEP contractors having finished all of their stub outs through the roof, we had our roofing contractor come back and finish our back-roof. This work included properly sealing all of the vent stub outs, adhering the roofing to the firewall, and painting the roof a reflective color to minimize heat gain and reduce the heat island effect. (For more information, please see http://www2.epa.gov/heat-islands/using-cool-roofs-reduce-heat-islands ). A green roof would have been the ideal, but we are quickly running out of funds for this project and a green roof would be too cost prohibitive.
All said, we had over 20 different people working on the building this week! Its great to see such progress and here’s to keeping up the momentum!
-
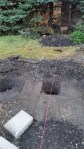
- A reference line runs through the middle of the column holes.
-
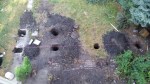
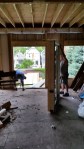
- View of the future support columns from the 2nd floor
-

- Bathtub installed for 2nd floor master
-

- Thermo-mixing valve installed
-

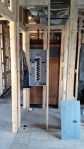
- Viewing of the media room wall with cable wiring installed
-
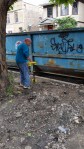
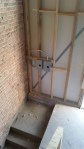
- Plumbing contractor measure the depth of the main sewer line
-
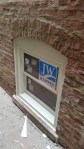
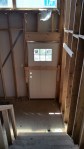
- Basement window with finished flashing
-

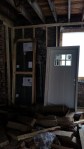
- 1st Floor dinning room with can lights installed
-

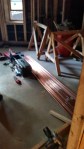
- HardiePlank delivered to site
-
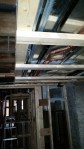
- Basement bulkhead with duct, gas piping, supply and return plumbing pipe, and conduit
-

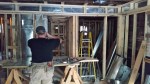
- Working on flashing in the front of the building. (Green mark on the ground indicates depth of the sewer line)
-
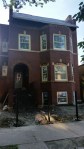
- Front of the building with partial flashing installed
-

- Back addition getting siding installed
-

- HVAC stub outs visible on new roof
-
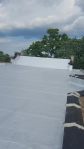
- New roof complete all the way through the back of the slopped front roof