Picking up from where we left off the previous week, with the basement ground fairly leveled out our contractors began by laying a basic plastic water proof membrane on the basement floor. This membrane is another step in trying to control the ground moisture from creeping up through the porous concrete. The continuous membrane is run along the basement soil, over the footings, and partially up the perimeter walls. The intent of this is for moisture to collect on the underside of the membrane and drain back into the soil. The perimeter walls and any woodwork used to cover the footings will be built on top of this membrane to prevent the wood from rotting.
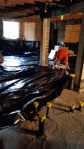
With the membrane in place, our HVAC crew arrived on site and began to lay 2-inch insulation on the ground. The insulation was placed to cover the entire basement floor and it was raised on the sides to insulate the slab from the perimeter footings. For both energy efficiency, occupant comfort as well as slab moisture control, we intend to install a radiant heating system into our basement slab. This insulation layer will, most importantly, make sure that we are heating our slab and not the ground. In colder climates, the ground can act as an infinite heat sink, which could lead to a lot of wasted energy and very high energy bills!
The next most important thing in a radiant heating system after the insulation is to try to push the radiant tubing towards the middle / upper half of the concrete slab (without being so close to the top that you actually see the tubing). We have estimated that the concrete slab to come in around 4-5 inches thick, therefore the sweet spot for our tubing is 2-3 inches above the top of the insulation. There are a few products on the market that allow you to do this fairly seamlessly, but as our construction budget is eroding, our HVAC guy opted to build his own that is a little more cost effective. Our contractor built a lattice structure out of PVC tubing and laid it on top of the insulation. Next he laid out the PEX radiant tubing and tied it down on to the PVC lattice. The ends of the radiant tubing loops were brought together and terminated at a temporary structure which will be the location of our in-wall radiant manifold. The manifold will eventually be supported by the wall 2x4s, but we need to make sure the tubing doesn’t move during the concrete pour (and doesn’t get buried by the concrete). We tried to place the manifold location as close to our mechanical closet to reduce the distance between the water heater and the manifold.
There were a few key items on the installation of the radiant tubing system that we made sure our contractor paid attention to. (1) The tubing was laid out with fairly uniform spacing and it was run to every corner of the basement floor. You want to be sure that the end result provides even heat throughout the basement and you don’t end up with hot and cold spots. (2) If you are using wax seals around your toilet fixtures, then you should keep a 8″ to 12″ distance from the seal to the tubing. This would prevent melting the wax seal, avoiding future leaks. (3) Place a protective sleeve on the radiant tubing at the point where the tubing penetrates the concrete into the manifold. The sleeve protects the tubing from shear forces put on the tubing which could cause the tubing to break.
With this system laid, we are waiting on our new water service to be installed and then its on to the concrete slab!
-
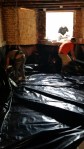
- Contractors laying the waterproof membrane
-
- The membrane is pulled tight and will have openings cut into it just large enough for the underground plumbing to come through
-

- Insulation coming in
-

- Contractors rolling out the PEX tubing
-

- Our temporary structure for the future manifold
-
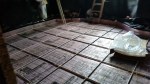
- PVC lattice system to elevate the radiant piping
-

- Our multiple radiant loops will terminate at the manifold
-

- Radiant piping spaced evenly and distributed throughout the basement
-

- Radiant keeping at least 8″-12″ from the toilet waste stack.
